Add an Alternative Attended Kiosk Flow
Use the steps below to create an alternative flow that branches off from the base flow when an attendant selects a button on the kiosk's Welcome screen. This manned kiosk flow provides a staff-assisted path, allowing attendants to guide customers through the purchase process.
See Kiosk Personalized Promotions to learn more about kiosk terminal personalized promotions.
Tools Required
- Kiosk terminal(s)
- Patheon Promotion Flows feature enabled. This feature is enabled by default for all organizations with license plate recognition.
Note: Unlike some kiosk personalized promotion workflows, this one does not require license plate recognition.
Configuration Steps
Create a Trigger
Use the following steps to create an On button press trigger.
- Log In to Patheon Portal.
- Select Configuration. The Configuration page opens.
- Select Kiosks. The Flows List panel opens.
- Select Promotion Flows. The Promotion Flows panel opens.
- Select Triggers. The Triggers panel opens.
- Select . The Create Trigger panel opens.
- In Name*, enter a name such as, Custom Wash Menu.
- In Type, select On button press. The Audience defaults to Any customer and cannot be changed.
- In Status, select Active.
- Select .
Add Button to Welcome Screen
- Log In to Patheon Portal.
- Select Configuration. The Configuration page opens.
- Select Kiosks. The Flows List panel opens.
- Navigate to the flow that should display the button to trigger the alternative workflow.
- Select . The edit flow (1 build flow) panel opens.
- Select . The edit flow (2 build screens) panel opens.
- Select Welcome.
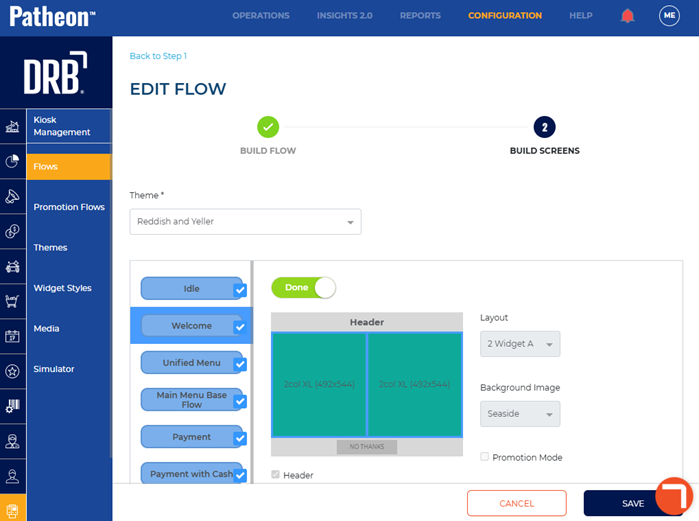
- Select the Done toggle. The toggle changes to WIP and the Welcome screen is now editable.
- Select the widget on the Welcome screen to be used as the button to trigger the alternative flow. The Widget Configuration dialog opens.
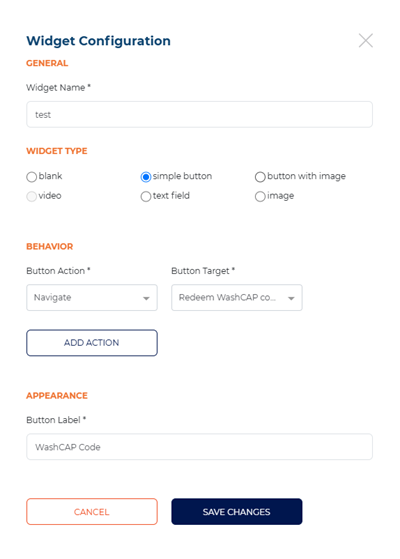
- Navigate to the widget type section.
- Ensure that either simple button or button with image is selected. Note: These are the only 2 widget types that can be used when adding a button to trigger an alternative flow.
- Navigate to the behavior section.
- In Button Action*, select Trigger promotion.
- In Button Target*, select Custom Wash Menu. This is the trigger created in the previous steps.
- Use the general section, widget type section, and appearance section to customize the widget.
- Select . The Widget Configuration dialog closes.
- Select the WIP widget. The toggle changes to Done.
- Select . The flows list panel opens.
Create Custom Wash Menu
- Log In to Patheon Portal.
- Select Configuration. The Configuration page opens.
- Select Kiosks. The Flows List panel opens.
- Select Promotion Flows. The Promotion Flows panel opens.
- Select . The Create Flow panel opens.
- Navigate to the tab.
- Navigate to the Details section.
- In Flow name*, enter a name, such as, Custom Wash Menu Flow.
- In Status, select Active.
- Navigate to the Triggers section.
- Select Add trigger. The Select Trigger* setting opens.
- In Select Trigger*, select Custom Wash Menu. This is the name of the trigger created in the previous steps.
- Navigate to the screen design panel.
- For New Screen 1, select Edit. The New Screen 1 panel opens.
- Navigate to the tab.
- In Screen name*, enter a name, such as, Custom Wash Menu Screen.
- In Screen type, select Default.
- Select the Text tool (
 ). A text box opens on the screen.
 - Double click the text box on the screen.
- Enter text, such as, Choose Your Wash.
- Select the Widget tool (
 ). A widget opens on the screen.
 - Navigate to the Actions section.
- In Type, select Purchase. The product section opens.
- In Type, select Wash.
- In Wash, select desired wash, such as, Good Wash. Note: If supported by your kiosk configuration, you can also add other purchasable items to this screen, such as washes, plans, and gift cards, all on one screen.
- Navigate to the navigation section.
- In Navigate to, select Payment flow or Upsell screen. Note: If you choose to navigate to an upsell screen, the system creates an additional screen in the flow that you must customize.
- Repeat the widget-creation process for each additional item you want to display on the kiosk screen, such as washes, plans, or gift cards, if supported by your kiosk.
- Select the Widget tool (). A widget opens on the screen.
- Navigate to the Actions section.
- In Type, select Select.
- Navigate to the form actions section.
- In Type, select Decline Promotion.
- Navigate to the navigation section.
- In Navigate to, select Product Selection Flow.
- Double click the widget on the screen.
- Enter text, such as, Show Regular Options.
- Use the Details section, Actions section, and Background section to configure the new custom wash menu screen.
Publish the Flow
- Log In to Patheon Portal.
- Select Kiosks. The flows list panel opens.
- Select the Custom Wash Menu Flow from the Flows list. The workfloW Overview panel opens.
- Select the edit icon next to SITES. The activated sites panel opens.
- Select the sites for which the screen should be available.
- Select . The activated sites panel opens and the screen is activated for the selected sites.
- Select . The screen is published to the selected sites.