Add a Kiosk Personalized New Customer Screen
Use these steps to create a kiosk workflow that incentives new customers. When the customer is identified by a license plate reader, an alternative new customer promotion is triggered and displayed. The customer can accept the promotion and proceed with the purchase, or decline it and continue through the standard kiosk workflow.
The content shown on the personalized screen can vary based on business needs. For example, you can configure the screen to display a third-party loyalty program sign-up, a custom menu of wash products or plans, or a simple promotional message with a dismiss button and timeout.
See Kiosk Personalized Promotions to learn more about kiosk terminal personalized promotions.
Tools Required
- License plate recognition
- Kiosk terminal(s)
- Patheon Promotion Flows feature enabled. This feature is enabled by default for all organizations with license plate recognition.
Configuration Steps
Create a New Customer Trigger
Use the following steps to create an On customer recognition trigger for new customers.
- Log In to Patheon Portal.
- Select Configuration. The Configuration page opens.
- Select Kiosks. The Flows List panel opens.
- Select Promotion Flows. The Promotion Flows panel opens.
- Select Triggers. The Triggers panel opens.
- Select . The Create Trigger panel opens.
- In Name*, enter a name for the trigger, such as, New Customer.
- In Type, select On customer recognition.
- In Audience, select New customers.
- In Status, select Active.
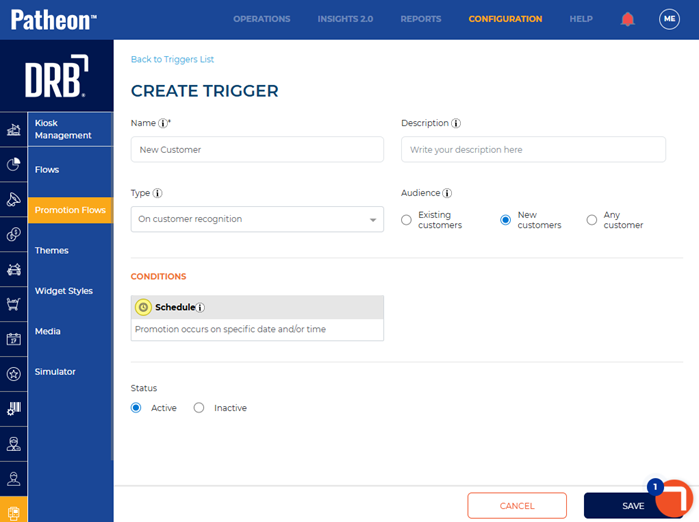
- Select .
Create a New Customer Promotion Flow
Use the following steps to create a New Customer promotion flow using the New Customer trigger. The screen you configure can present different types of content, depending on your use case. For example, you might display a third-party loyalty signup, a custom menu of wash products or plans, or a general message with a button and timeout. In this example, the New Customer Welcome screen is configured for a third-party loyalty program signup.
- Log In to Patheon Portal.
- Select Configuration. The Configuration page opens.
- Select Kiosks. The Flows List panel opens.
- Select Promotion Flows. The Promotion Flows panel opens.
- Select . The Create Flow panel opens.
- Navigate to the tab.
- Navigate to the Details section.
- In Flow name*, enter a name for the flow, such as, New Customer.
- In Status, select Active.
- Navigate to the Triggers section.
- Select Add trigger. The Select Trigger* setting opens.
- In Select Trigger*, select New Customer. This is the name of the trigger created in the previous steps.
- Navigate to the screen design panel.
- For New Screen 1, select Edit. The New Screen 1 panel opens.
- Navigate to the tab.
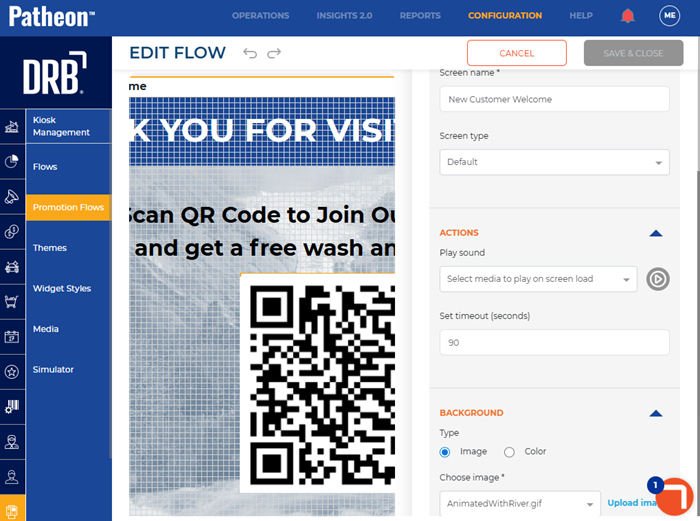
- In Screen name*, enter a name, such as, New Customer Welcome.
- In Screen type, select Default.
- Select the Text tool (
 ). A text box opens on the screen.
 - Double click the text box on the screen.
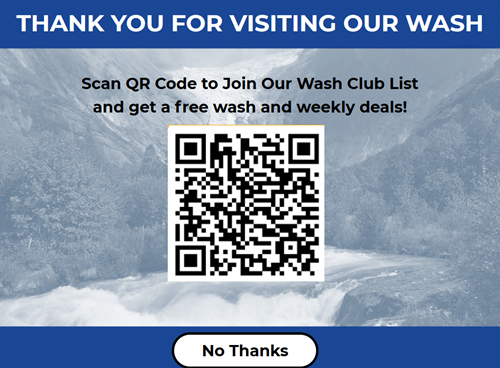
- Enter text, such as, Thank you for visiting our wash.
- Use the style section and the settings section to configure the text.
- Select the Text tool (). A text box opens on the screen.
- Double click the text box on the screen.
- Enter text, such as, Scan QR code to join our Wash Club list and get a free wash and weekly deals!. Note: You can also use this area to display other information, such as a QR code for a third-party loyalty system, a message asking the customer to see the tunnel loader for a keychain, or a custom first-time menu with specially priced washes.
- Use the style section and the settings section to configure the text.
- Select the Widget tool (
 ). A widget opens on the screen.
 - Navigate to the background section.
- In Type, select Image.
- In Choose image*, select the desired image for the QR code.
- Select the Widget tool (). A widget opens on the screen.
- Navigate to the form actions section.
- In Type, select Decline Promotion.
- Navigate to the navigation section.
- In Navigate to, select Product Selection Flow.
- Use the Details section, Actions section, and Background section to configure the new loyalty screen.
- Select . The Promotion Flows panel opens.
Publish New Customer Promotion Flow
- Log In to Patheon Portal.
- Select Kiosks. The flows list panel opens.
- Select New Customer from the Flows list. The workfloW Overview panel opens.
- Select the edit icon next to SITES. The activated sites panel opens.
- Select the sites for which the screen should be available.
- Select . The activated sites panel opens and the screen is activated for the selected sites.
- Select . The screen is published to the selected sites.