Add a Kiosk Personalized Winback Screen
Use the steps below to create a kiosk workflow that targets previous members with a winback offer based on their customer history. When the customer is identified by a license plate reader, the winback promotion is triggered and displayed. The customer can accept the offer and proceed with the purchase, or decline it and continue with the standard kiosk workflow.
See Kiosk Personalized Promotions to learn more about kiosk terminal personalized promotions.
Tools Required
- License plate recognition
- Kiosk terminal(s)
- Patheon Promotion Flows feature enabled. This feature is enabled by default for all organizations with license plate recognition.
Configuration Steps
Create a Trigger
Use the following steps to create an On customer recognition trigger for the predefined Inactive Members customer segment.
- Log In to Patheon Portal.
- Select Configuration. The Configuration page opens.
- Select Kiosks. The Flows List panel opens.
- Select Promotion Flows. The Promotion Flows panel opens.
- Select Triggers. The Triggers panel opens.
- Select . The Create Trigger panel opens.
- In Name*, enter a name for the trigger, such as, Segment - Inactive.
- In Type, select On customer recognition.
- In Audience, select Existing customers.
- Navigate to the Conditions section.
- Select Segment. A Segment section opens.
- In Choose segment*, select Inactive Members.
- In Status, select Active.
- Select .
Important Considerations
- The promotion can appear every time an eligible customer is recognized until that customer purchases a plan. Currently, there is no setting to limit the promotion to display only a specific number of times.
- The predefined Inactive Members segment may include customer statuses that a site may not want to target, such as Suspended and Discontinuing.
- If more control is needed, create a custom customer segment to target specific plan statuses or define criteria such as the number of days since the customer's last plan purchase.
Create a Winback Offer Promotion Flow
Use the following steps to create a Winback Offer promotion flow using the Segment - Inactive trigger created in the previous steps.
- Log In to Patheon Portal.
- Select Configuration. The Configuration page opens.
- Select Kiosks. The Flows List panel opens.
- Select Promotion Flows. The Promotion Flows panel opens.
- Select . The Create Flow panel opens.
- Navigate to the tab.
- Navigate to the Details section.
- In Flow name*, enter a name, such as, Winback Offer.
- In Status, select Active.
- Navigate to the Triggers section.
- Select Add trigger. The Select Trigger* setting opens.
- In Select Trigger*, select Segment - Inactive. This is the name of the trigger created in the previous steps.
- Navigate to the screen design panel.
- For New Screen 1, select Edit. The New Screen 1 panel opens.
- Navigate to the tab.
- In Screen name*, enter a name, such as, Winback Offer.
- Select the Text tool (
 ). A text box opens on the screen.
 - Double click the text box on the screen.
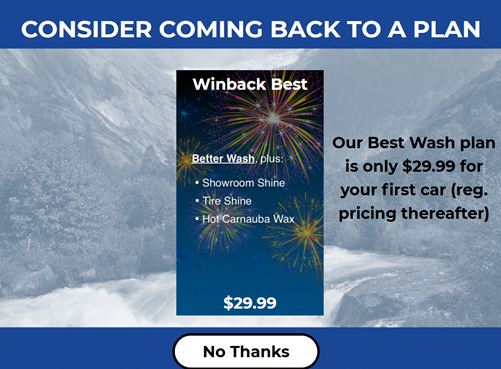
- Enter text, such as, Consider Coming Back To A Plan.
- Select the Widget tool (
 ). A widget opens on the screen.
 - Navigate to the Actions section.
- In Type, select Purchase. The product section opens.
- In Type, select Plan.
- In Plan, select desired plan. Note: You can create a duplicate plan at a lower price point and hide it on the POS so that only previous customers at the kiosk can receive this offer.
- Select the Text tool (). A text box opens on the screen.
- Double click the text box on the screen.
- Enter text, such as, Our [Wash Plan Name] is only $29.99 for your first car (reg. pricing thereafter).
- Select the Widget tool (). A widget opens on the screen.
- Navigate to the Actions section.
- In Type, select Select.
- Navigate to the form actions section.
- In Type, select Decline Promotion.
- Navigate to the navigation section.
- In Navigate to, select Product Selection Flow.
- Use the Details section, Actions section, and Background section to configure the new loyalty screen.
- Select . The Promotion Flows panel opens.
Publish Winback Offer Flow
- Log In to Patheon Portal.
- Select Kiosks. The flows list panel opens.
- Select the Winback Offer from the Flows list. The workfloW Overview panel opens.
- Select the edit icon next to SITES. The activated sites panel opens.
- Select the sites for which the screen should be available.
- Select . The activated sites panel opens and the screen is activated for the selected sites.
- Select . The screen is published to the selected sites.